Produces clean black-and-white path geometry for line art, stencils, engraving, vinyl cutting, and single-color design work.
SVG Line Tracer guide
From an image to your finished design.
Prepare colors, trace the image, add lettering and shapes, then export for design, cutting, or multi-color printing. The in-app Guide puts help beside the tools while you work.
Guide updated for version 0.6.13, released in the Chrome Web Store on September 15, 2026.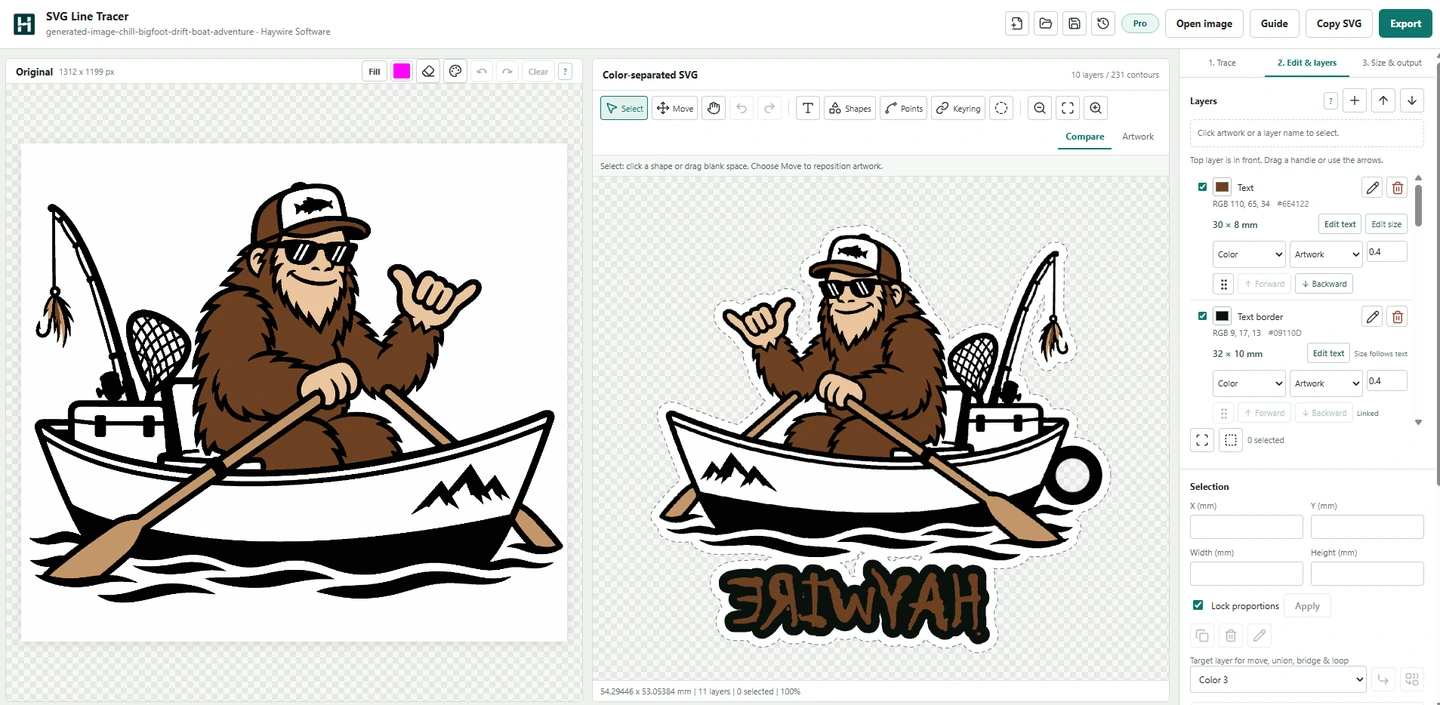
Quick start
Open, trace, edit, and make.
Right-click an image, open a local file, or start a blank drawing with text and shapes. Use the in-app Guide for help with the current task.
- 01Open & prepare
Choose Trace image to SVG from an image's right-click menu, or open, drop, or paste a file. Clean up source colors if needed.
- 02Trace
Use Monochrome for line art or Multi-color for separated color layers. Begin with Balanced detail and inspect the preview.
- 03Edit & layers
Select layers, add text or shapes, refine points, and choose what becomes artwork or a hole.
- 04Size & output
Set dimensions, backing, grouping, and mirror as needed. Save the project, then export SVG, 3MF, DXF, PDF, or PNG.
Prepare colors
Keep the palette intentional.
Simplify source colors before detailed vector editing. Source cleanup and retracing replace vector edits, so save a project first.
- Maximum colors and Auto merge
- Set a maximum, such as four colors, then auto merge similar colors. Similarity and the area each color covers guide the result. The maximum includes visible background colors and excludes transparency; a small accent may merge into a larger color.
- Refine the preview
- Review the proposed palette and manually merge or recolor where needed. Changing advanced detection settings resets earlier merge choices. Applying the result changes the source pixels.
- Fill and erase
- Recolor a connected source region or remove unwanted pixels. Give a cutout a distinct temporary color when it shares a color with artwork you want to retain. Source Undo is separate from vector Undo.
Trace modes
Choose the output the project needs.
Compare trace modes before detailed editing. Changing the trace regenerates the vector artwork and can replace your edits; save a project before switching.
Separates the source palette into controllable layers for slicers, layered signs, keychains, decals, and color-based editing.
Generated artwork
Prompt for separation, not atmosphere.
Start with any AI image generator that lets you describe the artwork you need. The goal is a simple source image whose colors already represent the parts, holes, and removable areas you intend to create.
Prompt recipe
Create a [subject] as clean, flat vector-style artwork for color separation. Use exactly [number] solid colors with crisp closed shapes on a plain [color] background. No gradients, shading, shadows, glow, texture, transparency, or photorealism. Use [distinct color] only for cutout areas and [another distinct color] only for any border that should be removed. Do not reuse those colors elsewhere.
“Vector-style” describes the desired appearance. The generator may still return a raster PNG or JPG, which SVG Line Tracer converts into paths.- 01Ask for production artwork
Request clean, flat vector-style artwork with solid colors, crisp closed shapes, and a plain background. Exclude gradients, shading, shadows, glow, texture, and photorealism.
- 02Separate every role
Give cutouts and removable borders distinct temporary colors that are not used by artwork you want to keep. Each detected color can receive only one layer role.
- 03Keep the palette intentional
Name a small color palette and simplify the composition. Fine texture and decorative detail produce more contours, slower imports, and more cleanup.
When two jobs share one color
If a cutout and a border are both black, the tracer sees one color layer and can apply only one Color, Cutout, or Ignore role to it. Separate them first in Paint, Photoshop, or another image editor; ask for distinct colors in the prompt; or use the Fill tool on the imported image inside SVG Line Tracer.
Trace settings
Clean the geometry before export.
Begin with Balanced detail and the default values. Change one control at a time and watch the vector preview.
- Black threshold
- Controls which tones become foreground in Monochrome mode. Raise it to include lighter gray marks; lower it when shadows create unwanted shapes.
- Invert foreground
- Traces light artwork on a dark background instead of the usual dark artwork on white.
- Close small gaps
- Connects nearby breaks before tracing. Useful for scanned ink, generated line art, and open outlines.
- Despeckle
- Removes small islands and fills small holes. Increase it carefully to clear dust and texture without losing small details.
- Path simplification
- Reduces the number of path points. Higher values create smoother, lighter SVG files but can remove fine detail.
- Trace detail
- Fast, Balanced, and Fine use 800, 1200, and 1800 pixel processing resolutions. Fine — Pro or credit preserves more small contours. Saved Fine-detail projects retain that export requirement when reopened.
Color layers
Tell every detected color what to become.
Automatic detection gets the first pass ready. These controls shape the layer structure for the application receiving the SVG.
- Automatic palette
- Finds the colors and layer count from the artwork. It is not limited to a preset number of colors.
- Manual colors
- Turn off Automatic palette to set the trace layer count. Start with Prepare colors and Auto merge for near-duplicate colors; changing the trace palette can replace a prepared palette and retrace the artwork.
- Remove edge background
- Removes the color connected to the image edge while keeping enclosed regions of that same color available as artwork.
- Fill tool
- Region Fill recolors one connected area on the source-image side. Give a hole, border, or other shared-color area its own temporary color, then assign that new layer to Color, Cutout, or Ignore.
- Fill tolerance
- Controls how broadly Region Fill includes nearby shades. Raise it when antialiased or slightly varied pixels belong to the same area.
- Fill grow
- Expands Region Fill by up to four pixels to cover fringe colors along a generated edge. Use the smallest value that removes the unwanted halo.
- Layer color
- Click a layer swatch to replace its export color without editing the original image.
- Color
- Exports the selected layer as filled SVG geometry.
- Cutout
- Subtracts the selected layer from the surrounding geometry to create transparent holes, including key-ring openings and letter counters.
- Ignore
- Omits an unwanted color such as a generated outline, border, or artifact from the exported SVG.
- Path grouping
- Exports one object per color for a cleaner slicer object list, or keeps disconnected components as separate paths when individual control is useful.
- Outer boundary
- In Size & output, build a surround or backing from the current artwork, including added text and shapes, without retracing. This can hold separated parts together as a keychain, badge, sign, or layered print.
- Boundary guide
- Shows a dotted editor-only outline when a white or light surround is difficult to see. The guide is not included in the exported artwork.
- Mirror for face-down print
- Flips the artwork before export so lettering and details read correctly after a face-down multi-color print is removed from the build plate.
- Physical size
- Scales the SVG to the intended real-world width or height before it reaches a slicer or fabrication program.
Edit & layers
Make the artwork your own.
Use the toolbar for selection, movement, text, shapes, points, and keyring placement. Layer controls keep sizes, colors, and stacking order beside the selected artwork.
- Select and Move
- Select picks shapes without moving them. Drag blank space for a selection box; use Shift to extend a selection. Choose Move when you want to reposition artwork. Undo can restore a completed move.
- Zoom into details
- Choose the magnifier and click the detail you want to repair. Alt-click zooms out. Ctrl/Cmd + wheel zooms at the pointer; Fit brings the full artwork back into view.
- Layer color, size, and order
- Selected layers show their exact swatch and color value in the sidebar. Use Edit size or Selection dimensions for millimeter sizing. The top layer is in front: drag a handle, use the Forward/Backward buttons, or use the handle's keyboard controls to reorder.
- Shapes drawer
- Draw a Rectangle, Ellipse, Triangle, Diamond, Pentagon, Hexagon, Star, or Arrow. Drag on the artwork, or choose Enter size for exact dimensions. Hold Shift for equal dimensions or Alt to draw from the center.
- Custom polygon and Points
- Place a custom polygon's corners, then close it at the first point. Use Points to move, add, or delete points on ordinary shapes, retaining at least three points per ring. Text and generated backing use their dedicated editing controls.
- Text and colored borders
- Add lettering, choose its size and color, and give it a linked border color. Reopen Edit text from its layer at any time. Deleting text also deletes its border; deleting only the border keeps the text.
- Fonts
- Import TTF, OTF, WOFF, or WOFF2 files locally. Load installed fonts is optional and asks for browser permission. Used imported fonts travel with saved projects; installed fonts do not. Saved text outlines still display and export on another computer.
- Keyring placement
- Choose Hole in artwork to cut a hole into an existing area, or Attached loop to extend beyond the edge. Preview its size and chosen color before placing it. Attaching joins geometry; when text is the target, it fixes the wording and font into geometry. Use Undo to restore the editable text.
- Delete and undo
- Use the trash button in a layer or the Selection panel to delete. Undo and Redo recover vector edits. Source-image edits and vector edits have separate histories; save a project before source cleanup or retracing.
Save & recovery
Keep an editable copy.
Save a .sltproject file before major changes. Project and preset saving do not use an export allowance or credit.
- Open a saved project
- Reopen the source image, edited artwork, text, settings, and included imported fonts. Saved outlines remain visible even when another computer does not have the same installed fonts.
- Local recovery
- Recovery stays in this browser until replaced or extension storage is cleared. Keep downloaded projects as your own copies; removing the extension does not delete those files.
- Sharing a project
- Projects contain artwork and any used imported font assets. Share only assets you are entitled to share, and keep a separate saved copy of important work.
Import and export
Use the workflow that fits the source.
PNG, JPG, WEBP, GIF, and BMP images can be opened directly. Browser capture is best when the image is already visible on a webpage.
Trace image to SVGCaptures the selected visible image from Chrome's right-click menu.Free
Open imageSelects a local file; drag-and-drop and clipboard paste are also supported.Free
Download SVGSaves monochrome SVG geometry to the normal Chrome download location.3/week Free
Download layered SVGSaves color-separated geometry with your chosen layer roles and grouping.3/month Free
3MF, DXF, PNG, and PDFExports model-only 3MF geometry, millimeter DXF layers, high-resolution PNG, or vector PDF.Allowance or credit
Starter PackAdds 25 monochrome and 10 multi-color export credits. Normal exports use free allowances before credits.$2.99 once
Unlimited exportsRemoves both the weekly monochrome allowance and monthly color-layer allowance.Pro
Fine detail and Copy SVGUses one purchased credit per result, or remains unlimited while Pro is active.Credit or Pro
What counts as a multi-color export?
Multi-color tracing or more than one exported artwork color uses the multi-color allowance. Automatic backing, Cutout, and Ignore layers are excluded from that color count. Free allowances are three monochrome exports per calendar week and three multi-color exports per calendar month. Fine-detail output and Copy SVG require a purchased credit unless Pro is active. Purchased credits do not reset monthly.
Slicer workflow
Bring color layers in as one multi-part object.
The SVG supplies separated geometry. Most slicers use that part structure but do not reliably turn SVG fill colors into filament assignments, so material selection and print setup remain part of the slicer workflow.
- 01Group by color
Choose One object per color when you want a manageable part list in the slicer.
- 02Export the layers
Set Color, Cutout, and Ignore roles, add a boundary if needed, then download the layered SVG.
- 03Import as one assembly
In OrcaSlicer or a compatible derivative, import the SVG as one object with multiple parts when that option is offered.
- 04Finish in the slicer
Assign filament or material to each part, confirm dimensions and orientation, and choose suitable print settings.
Allow time for complex files.
Dense contours and large layer counts can take OrcaSlicer and related applications longer to parse. Prepare colors with Auto merge first. Increase Despeckle or Path simplification carefully when the source produces more geometry than the finished piece needs. Save before retracing.
Beyond the slicer
Layered SVG is useful anywhere color defines a process.
Multi-color 3D printing
Keychains, badges, face-down signs, inlays, and other joined multi-part models.
Garment and transfer printing
Layer preparation for sublimation, DTF, and DTG artwork workflows.
UV and large-format printing
Separated artwork for UV printers, signs, displays, and other color-managed output.
Stickers and vinyl
Color-based geometry for decals, sticker production, and vinyl plotter workflows.
Laser marking
Layer organization for MOPA, fiber, engraving, and process-specific laser setups.
Cutting, plasma, and CNC
Paths for plasma cutting, laser cutting, routing, plotting, and other toolpath preparation workflows.
Logo creation and identity
Clean vector concepts for logos, marks, badges, lettering, and other reusable brand artwork.
Web, applications, and video
Layered vector assets for websites, application interfaces, motion graphics, titles, overlays, and general creative production.
Every output process has its own material, color, toolpath, and safety requirements. Review the geometry and complete the appropriate production setup in the receiving software before making the final item.
Better results
Start with clean, intentional artwork.
- Use distinct, flat colors and clear edges for reliable automatic color separation.
- If Automatic palette finds near-duplicate colors, use Prepare colors and Auto merge, then refine the preview. Changing Manual colors retraces and can replace the prepared palette.
- Crop away captions, borders, shadows, and unrelated page elements when possible.
- Use the Fill tool to separate a shared-color area, Ignore for an unwanted outline, and Cutout only for geometry that should become a hole.
- Group paths by color for a shorter slicer object list; keep separate components when each shape needs individual control.
- Add a boundary surround when disconnected artwork needs a common backing to hold the finished object together.
- Enable the editor-only boundary guide when a white surround blends into the preview background.
- Prefer simple artwork. Some images contain too much texture, shading, or fine detail to become practical production paths without cleanup.
- Use only artwork you own or are legally entitled to trace and export.